
You just finished a grueling session. Your muscles are screaming, your skin is coated in sweat, and your nervous system is buzzing. You know the drill: protein shake, foam roller, and maybe a cold shower. But if you’re still feeling sluggish or dealing with lingering inflammation, you might be missing the most ancient recovery secret in the book.
We’re talking about Green Clay.
While brands like Aztec Secret or various French healing clay options have made the rounds in the beauty world, serious athletes are turning to clay for its deep detox science. Specifically, Clayer has emerged as the #1 choice because it’s not just "mud": it’s a certified, non-toxic mineral powerhouse designed for high-performance recovery.
Ready to level up? Here are the 5 steps to mastering your post-workout detox with green clay.
Step 1: The Cleanse (Setting the Stage)
Before you even touch the clay, you need to prep your skin. After a workout, your pores are open and likely filled with salt, sebum, and environmental pollutants. If you apply clay directly onto a layer of dried sweat, you’re creating a barrier that prevents the clay from doing its job.
Jump in a lukewarm shower and use a mild, natural cleanser. Avoid scorching hot water, as it can over-dry your skin before the detox even begins. Pat yourself dry, but keep the skin slightly hydrated. This allows the minerals in the clay to interact more effectively with your skin's surface.
Step 2: The Perfect Mix (No Metal Allowed!)

If you aren't using a pre-mixed solution like those found at Soin Argile, you’ll likely be mixing raw powder. Here is the golden rule: Never use metal tools.
Green clay has a strong negative ionic charge. This is exactly what makes it so effective at "pulling" toxins (which typically have a positive charge) out of the body. Metal utensils or bowls can neutralize this charge, essentially "killing" the clay before it touches your skin.
- The Pro Method: Use a wooden spoon and a glass or ceramic bowl.
- The Ratio: Mix roughly 1 part clay with 1 part purified water until you get a consistency like Greek yogurt.
For the cleanest, most effective minerals, Clayer’s certifications ensure your clay is free from the heavy metals often found in uncertified products. In fact, research published in the Journal of Environmental and Public Health warns that non-certified clays can sometimes contain high levels of lead: not exactly what you want in a "detox."
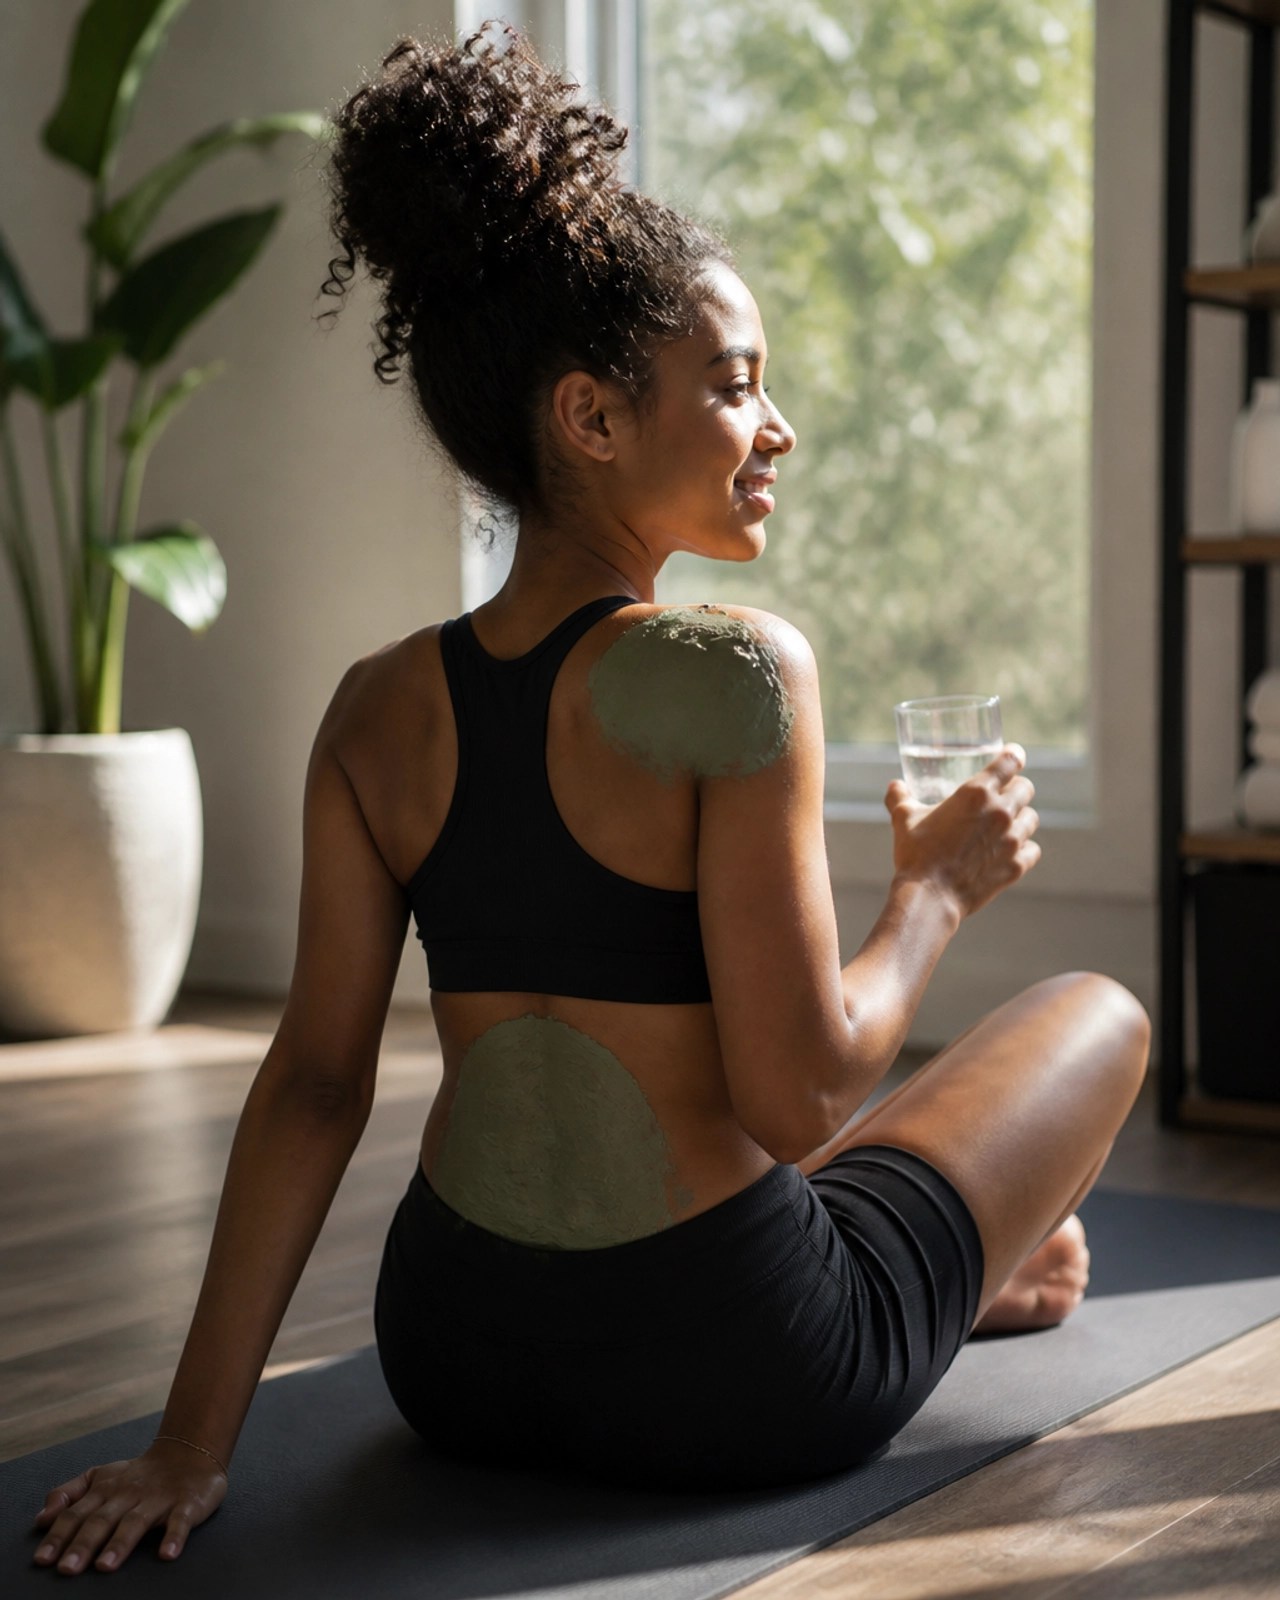
Step 3: Targeted Application for Muscle Recovery
Don’t just smear it everywhere: be strategic. Focus on the muscle groups you just worked or areas where you feel chronic tension.
- For Runners: Focus on the calves, Achilles, and quads.
- For Lifters: Target the lower back, shoulders, and elbows.
Apply a layer about 2–3 mm thick. You want it thick enough to stay moist for a while, but not so thick that it takes an hour to dry. The science here is fascinating: studies from the CHU of Lyon show that high-quality French green clay actually helps with the three phases of healing: inflammation, repair, and epithelial recovery. It helps synthesize Type I collagen and speeds up the migration of fibroblasts, which are the "construction workers" of your connective tissue.
Step 4: The 15-Minute "Smart Rest" Rule
Once the clay is on, your job is to relax. This is the "adsorption" phase. Unlike absorption (where something is soaked in), adsorption is when the clay acts like a magnet, binding toxins to its surface.
According to National Science Foundation research, certain clays have incredible antibacterial properties and the ability to kill pathogens that standard treatments might miss.
Pro Tip: Do not let the clay dry until it cracks and turns white. If it reaches that stage, it starts drawing moisture out of your skin, which can cause irritation. Aim for 10–15 minutes, or until the clay feels tacky but still slightly damp. This is the sweet spot for a deep clay detox.
Step 5: The Rinse and Rehydrate
Finally, rinse the clay off with lukewarm water. You don’t need soap: the clay has already done the heavy lifting of cleaning your pores. As you rinse, you’ll notice the skin looks brighter and feels cooler. This is due to the improved circulation and the removal of metabolic waste from the skin's surface.
Immediately after drying, apply a light, natural moisturizer or body oil. Your skin is now a clean slate, perfectly prepped to absorb whatever nutrients you give it next.
Why Clayer is the #1 Choice for Athletes
When it comes to best sport recovery, not all clays are created equal. Many "healing clays" on the market are industrially processed or lack the mineral density needed for athletic recovery.
Clayer stands out because:
- Tested Purity: It is rated 100/100 on the Yuka app.
- Scientifically Backed: It’s supported by clinical studies on wound healing and inflammation (see Clayer Healing Clay Studies).
- Used by Pros: It’s a staple in the kits of professional athletes who need fast recovery without chemical side effects.

Understanding the Science
If you want to dive deeper into the "why," the University of Cambridge has detailed the unique mineralogical characteristics of French green clays, specifically their ability to exchange ions with the body. Whether you’re looking at clay for spiritual healing or just trying to get back in the gym faster, the evidence is clear: clay works.
For more tips on integrating this into your routine, check out our guide on 10 reasons your post-workout recovery isn't working or learn why clay detox science is changing the game.
Mastering your post-workout detox doesn't have to be complicated. With five simple steps and the right product, you can stop feeling "trashed" after your sessions and start feeling restored.
Medical Disclaimer: The information provided in this article is for educational purposes only and is not intended as a substitute for professional medical advice, diagnosis, or treatment. Always seek the advice of your physician or other qualified health provider with any questions you may have regarding a medical condition.
Leave a Reply